Index > Getting Started
- Welcome to MultiMax!
- Getting Started
- Create your original sound (for advanced users)
- Digital Audio Signal Processing of MultiMax
- Phase Shifter
- Bass Parametric Equalizer
- Stereo Image Enhancer
- Input Automatic Gain Controller (AGC)
- Pre-emphasis booster and HF limiter
- Multiband Limiter
- Soft-Knee Clipper
- Release Time
- Bass (Band #1) Attack Time (ms)
- Bass Band (Band #1) Clipping Knee
- Final Clipper
- Overshoot Cutter
- Create the original sound by changing the factory preset
- Save your sound parameters
Getting Started

Make a playlist and playback WAV files
Let's start trying MultiMax. First of all, you have to make a playlist of WAV files which are extracted from music CDs.
![]() 1) Create some WAV files with 44.1KHz, 2ch, Uncompressed and 16bit format by extracting from music CDs.
1) Create some WAV files with 44.1KHz, 2ch, Uncompressed and 16bit format by extracting from music CDs.
2) Choose "Register WAV files to the playlist" of "File" menu and choose the WAV files you extracted. You can choose multiple files by pressing SHIFT or CTRL key together.
<NOTE> Register WAV files by "Drag & Drop"
You can register WAV files by "Drag & Drop" to the MultiMax window. If the files are the valid WAV format (32kHz/44.1KHz/48kHz, 1ch/2ch, Uncompressed, 16bit), the file will be added to the playlist.
 The file name will appear on the playlist.
![]() The registered files can be sorted by ascending or descending order. Just the file name will be shown on the list, but the full path name to the file will be used for sorting process.
The registered files can be sorted by ascending or descending order. Just the file name will be shown on the list, but the full path name to the file will be used for sorting process.
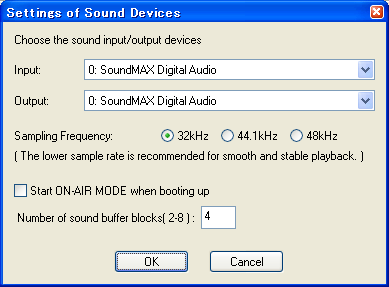
Befor playing, the settings of sound device should be done.
1) Choose "Sound Device Setings.. " of "File" menu.
2) Select the input / output device of your PC
3) Press OK
<NOTE> The sampling frequency option is used for "ON AIR MODE". You need not pay any mind to it.
The number of sound buffer blocks is set to '4' by default. It should be used for "ON AIR MODE" as well.

And t hen, let's listen to the processed sound by MultiMax.
![]() 1) Choose "Play" of "Playlist" menu or press [PLAY] button on the toolbar.
1) Choose "Play" of "Playlist" menu or press [PLAY] button on the toolbar.
<NOTE> Playback by double-clicking on the playlist
You can start playback by double-clicking the file name on the playlist. You can stop playing by double-clicking anywhere on the playlist again.
Meters
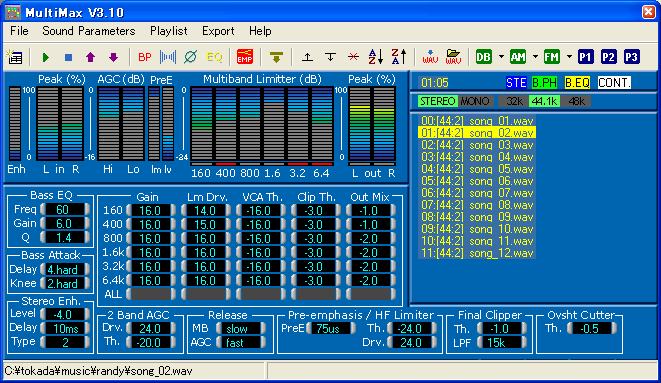
The following description is about the sound meters or indicators on the main window.
![]() Stereo Enhance Level:
Stereo Enhance Level:
This is the peak level meters for the stereo enhancing function. This shows the (L-R) signal level mived to the mail audio line. This scale is linear and its unit is not "dB". The maximum level "100%" is equivalent to 16bit digital audio range "+32767".
 Peak Level (INPUT)
This is the input peak level meters. This scale is linear and its unit is not "dB". The maximum level "100%" is equivalent to 16bit digital audio range "+32767".
 AGC: Limiting ratio of input sound level
This shows the limiting ratio (dB) of 2 band AGCs (Automatic Gain Controllers) just after the input. The recording level of every song is deferent. This AGC will uniform the sound level sent to the multiband limiter in order to get the best effect. The level bar shows the limiting ratio.This AGC has crossover at 200Hz and the low and high bands are processed separately.
![]() Pre-emphasis Limiting ratio and HF level
Pre-emphasis Limiting ratio and HF level
These meters are for the pre-emphasis adjustment. MultiMax supports 50us / 75us pre-emphasis for FM broadcast. Over 2kHz is boosted with 6db/oct slope for 75us pre-emphasis, and over 3kHz is boosted with 6db/oct slope for 50us pre-emphasis. In order to avoid clipping of high frequency band by pre-emphasis booster, MultiMax has an HF limiter. These meters shows the HF limiting ratio(dB) and HF signal level (%).
 Multi Band Limiter(dB): Limiting ratio of each band
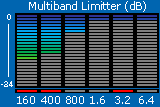
This shows the limiting ratio (dB) of each frequency band separately. The level bar shows the limiting ratio and a scale means -1dB. The red lamps under the meter are clipping indicators for each band. The clipper is located after the multiband limiter. It cuts the unnecessary peaks and suppress the signal to a certain level. This clipper is, so-called, "Soft knee" clipper and the distortion sound can be soft like a vacuum tube amplifier.
 Peak Level (OUTOUT)
This is the outout peak level meters. This scale is linear and its unit is not "dB". The maximum level "100%" is equivalent to 16bit digital audio range "+32767". The red clipping indicator lights when the final output just before the de-emphasis filter would overshot -0.2dB.
By choosing "Stop" of "Playlist" menu, you can stop playing.
[NOTE]
For the trial version, the message dialog will appear and the playback will be forced to stop after 90 seconds.
Factory Presets
![]() The recommended sound settings can be used by pressing"DB, "AM" and "FM" button.
The recommended sound settings can be used by pressing"DB, "AM" and "FM" button.
DB : [ Digital Broadcast Presets] : NO EMPHASIS
These presets can be used for wide variety purposes, for example, creating MP3 fles for portable player or car audio.
| Preset Name | Features |
| Digital Broadcast - Wide Stereo (General Purpose) | Can be used for general purpose or any music. |
| Digital Broadcast - Punchy Bass (Hip-Hop Music) | Provides punchy bass. Suitable for prevalent Hip-Hop music. |
| Digital Broadcast - Bright and Dense (Rock Music) | Provides bright and dense sound. |
| Digital Broadcast - Clear Vocal (POP Music) | Provides clear vocal sound. |
AM : [ AM broadcast / For Internet Radio Presets]
These presets can be used for creating streaming files for internet radio. These can accomodate to the speech sound source which varies it's level drastically.
| Preset Name | Features |
| Internet Radio Station - Talk & Music Show | For internet radio which is doing music programs mainly The final LPF is set to 8kHz. This is suitable for 32kbps - 64kbps bit rate. |
| AM Radio Station - Talk Show | For internet radio which is doing speech programs mainly The final LPF is set to 6kHz for low broadcasting bit rate and the attack time is set to "fast" for voice source. |
FM : [ Simulates FM broadcasting sound ]: WITH PRE-EMPHASIS / DE-EMPHASIS
These presets simulate the actual FM sound by the pre-emphasis booster and de-emphasis LPF. With the pre-emphasis feature, you can use it as a pre-processor for actual FM broadcast.
| Preset Name | Features |
| FM Station - Smooth Listening (Favorite FM ) | This is the newest preset for long time listening. The high frequency part is compressed more deeply according to the FM Pre-emphasis Characteristics. |
| FM Station - Wide Stereo (General Purpose) | Simulates a typical FM station which plays hit charts. |
| FM Station - Punchy Bass (Hip-Hop Music) | Provides punchy bass. Simulates prevalent Hip-Hop FM station. |
| FM Station - Bright and Dense (Rock Music) | Provides bright and dense sound. Simulates urban loud FM station. |
| FM Station - Clear Vocal (POP Music) | Provides clear vocal sound. Simulates typical FM station. |
By choosing "Save Parameter to" of "Sound Parameter" menu, you can save the current settings to the user's presets. You can recall the saved settings by choosing "Use User's Preset" of "Sound Parameter" menu or by simply pressing P1,P2 or P3 button.
[ The most recommended preset ..]
The preset " FM Station - Wide Stereo(General Purpose) " has been tuned most carefully. Its sound is very close to actual prevalent FM sound on the air. The peak level of high frequency band is suppressed beautifully and it sounds very musical. If you want more crispy sound, the preset " Digital Broadcast - Wide Stereo(General Purpose) " is recommended.
Check the effect of MultiMax
![]() The compression process can be disabled by pressing "BP" (Bypass) button. When "BYPASS" indicator is shown, the input sound will be sent to the output directly. You can confirm the difference between processed sound and original source.
The compression process can be disabled by pressing "BP" (Bypass) button. When "BYPASS" indicator is shown, the input sound will be sent to the output directly. You can confirm the difference between processed sound and original source.
Change the songs on the playlist
 The song order of the playlist can be changed by pressing the buttons on the toolbar.
Choose the song to play
You can choose a song to play by UP/DOWN button. The selected file name is shown on the yellow bar. In another way, you can choose the song by simply clicking on the file name of the playlist.
Change the song order and remove a song from the playlist
You can move the song order by UP/DOWN button. The "CROSS" button can be used to remove a song from the playlist.
Sort the song order on the playlist
The songs on the playlist can be sorted by ascending or descending order. Just the file name will be shown on the list, but the full path name to the file will be used for sorting process.
Continuous Playback
You can switch the continuous playback mode by pressing this button. "CONT." will be shown when this mode is enabled. From the current song to the last song on the playlist will be played.
Save and open the playlist
The playlist can be saved to a file with "PLT" file extension. If you change the path name to the WAV files after registering to the playlist, the song will be invalid.
Create new WAV files processed by MultiMax
You can create a new WAV file processed and optimized by MultiMax by pressing "WAV" button. And, you can process all WAV files in a folder at a time by pressing "FOLDER" button. The new WAV file will be prefixed "mm_" to the original WAV file name.
Detect the peak level from the original WAV file
By choosing "Get Peak Level" of "Playlist" menu, MultiMax detects the peak level of each song by scanning the WAV file. The peak level information will be used to normalize the WAV level but no change will be made to the WAV files. Once you detect the peak level, the "#" mark will be shown at the file name. This peak level information can be saved to the playlist file.
Advanced Features "ON AIR MODE"
In this section, let's learn the "ON AIR MODE" which can process the analog sources fed to the sound interface card. You can enjoy the punchy and clear sound from original CD recordings like actual FM broadcasting.
To use "ON AIR MODE", you have to make the proper sound settings of your PC. Now, let's think about an example that a CD player is connected to the LINE input of sound card and the output of the same card is connected to the amplifier.
1) Open the "Sound and Multimedia Property" of the Control Panel.
2) Choose "Audio" tab.
3) Choose the sound card from the pull-down box of "Play Sound". And then, press "Volume" button and check just "Wave/MPN" and "Play Control". Be sure that any other outputs are set to "MUTE".
4) Next, choose the sound card at the "Record" section, too. And then, press "Volume" button and choose "LINE IN". The volume should be set to about 80%.
Be sure that the input and output devices must be selected from the SAME audio card. If not, the scratch may occur.
And then you switch to "ON AIR MODE" like followings.
1) Choose "Sound Device Settings" of "Sound Parameter" menu.
2) Choose the sound input/output devices. You have to choose the same one as you chose at "Sound and Multimedia Property" of the Control Panel.
3) Choose the sampling frequency. At first, you should choose 32kHz which needs less CPU power than others.
4) Close the dialog.
5) Next, choose "ON AIR MODE" of "Sound Parameter" menu. While using "ON AIR MODE", you cannot play any WAV file. To exit this mode, choose "ON AIR MODE" of "Sound Parameter" menu again.
6) To start processing, press "PLAY" button.
7) To stop processing, press "STOP" button.
8) To exit this ON AIR MODE, choose "ON AIR MODE" of "Sound Parameter" menu again.
<NOTE> If your PC has a Pentium4 processor which supports HT(Hyper-Threading) mode, the playback will be more stable.
References about "On Air Mode"
About adjusting input volume
The adjustment of input level to the sound card is very important and critical. After going into "ON IAR MODE", press "BYPASS" button and output the original sound directly. And confirm that the output sound is not clipped. You can see the output level with the level meter and the clipping indicator.
About the delay from input to output
When using ON AIR MODE, the output sound will be delayed for about 1 second. This is because of the processing time and the buffering time. You cannot remove this delay time.
It is capable to change the buffer length at "Settings of Sound Devices" dialog. If you use a high-performance PC, you can set the ' Number of sound buffer blocks' to '2' in order to get the minimum latency.
About the requirement of PC
MultiMax needs CPU power to process the sound. While using ON AIR MODE, if you launch another application on your PC, the playback sound may break sometimes. Do not use the other applications while using MultiMax. If your PC has a Pentium4 processor which supports HT(Hyper-Threading) mode, it is recommended to use the HT mode for more stable playback.