Index > Create original sound
FabulousMP3
User's Manual
Create original sound ( Advanced )
The settings of FabulousMP3 parameters would be so delicate. It will take pretty long time to complete the sound you want. Please try it without hurry.
You can restore the factory presets by choosing "Recommended Presets" of "Sound Parameter" menu.
Audio Signal Processing of FabulousMP3
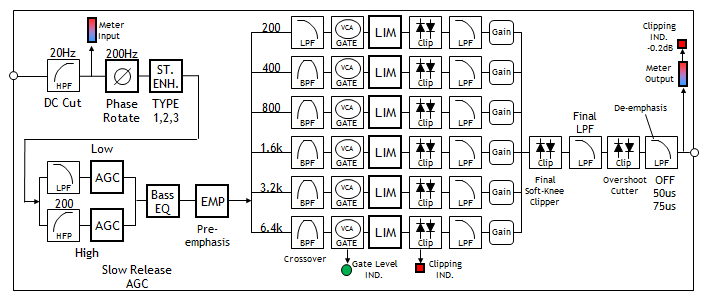
First, let's see the block diagram of audio processing. The following descriptions are about the signal processing blocks and parameters.
NOISE GATE LEVEL
![]() The green lamps indicate the noise gate status of each band.
The green lamps indicate the noise gate status of each band.
This feature can be used if the sound source contains some hiss noise or white noise such as an analog music cassette tape. The gate level can be adjusted using the Gate Threshold level of each band. The adjustment should be done like:
1) Play the sound portion that contains only hiss noise such as the portion between songs.
2) Set the Gate Threshold level of each band to the level just before the green lamps get lighting.
Noise gate more than 90% open ( higher than -1dB ) : Lamp FULL lighting
Noise gate 50% ~ 90% open ( -6dB ~ -1dB ): Lamp 2/3 lighting
Noise gate 25% ~ 50% open ( -12dB ~ -6dB ): Lamp 1/3 lighting
Noise gate less than 25% open (lower than -12dB ): Lamp OFF
The noise gate feature is enabled when the NOISE GATE button is ON. When the button is OFF, the noise gate feature will be disabled and all gates fully get open.
Phase Shifter
![]() The input signal from WAV file passes a HPF (High Pass Filter) to remove DC signal. Then it is sent to an APF (All Pass Filter) which has a 200Hz pole. By the phase shifting process, the low frequency part of the music would delay comparing to the upper frequency band, and it enhances the bass image. The effect of phase shifter can be switched by pressing "Phase" button. "B.PH" is the indicator of phase shifter effect.
The input signal from WAV file passes a HPF (High Pass Filter) to remove DC signal. Then it is sent to an APF (All Pass Filter) which has a 200Hz pole. By the phase shifting process, the low frequency part of the music would delay comparing to the upper frequency band, and it enhances the bass image. The effect of phase shifter can be switched by pressing "Phase" button. "B.PH" is the indicator of phase shifter effect.
Bass Parametric Equalizer
![]() After APF, the signal is sent to a parametric EQ for boosting the bass band. This EQ is used for emphasizing the bass guitar or kick drum, and it gives the bass sound more punch. It is effective if you boost around 80Hz by 3 to 6 dB. Even if you would boost the bass enough, the bass will be suppressed by multiband limiter and the bass level will not be raised. It gives the bass sound more punch, and the decay time of bass guitar can be sustained.
After APF, the signal is sent to a parametric EQ for boosting the bass band. This EQ is used for emphasizing the bass guitar or kick drum, and it gives the bass sound more punch. It is effective if you boost around 80Hz by 3 to 6 dB. Even if you would boost the bass enough, the bass will be suppressed by multiband limiter and the bass level will not be raised. It gives the bass sound more punch, and the decay time of bass guitar can be sustained.
 <Parameter description>
Freq(Hz) : The center frequency of parametric EQ
Gain(dB) : Boost Gain
Q : Width of band (Q=1.4 means 1 octave)
Stereo Image Enhancer
![]() The stereo image enhancer follows the bass parametric EQ. This processing part is for enhancing and spreading the stereo image. It adds the delayed signal of (L-R) to create stereo enhancement. This algorithm is so popular and a lot of HiFi audio products have this circuit.
The stereo image enhancer follows the bass parametric EQ. This processing part is for enhancing and spreading the stereo image. It adds the delayed signal of (L-R) to create stereo enhancement. This algorithm is so popular and a lot of HiFi audio products have this circuit.
The stereo enhancer has 5 types of algorithm. The first mode adds the L-R signal directly which is the same as the popular algorithm. And other two modes add the L-R signal after multiplying its own level. By multiplying its own level, the L-R signal is added only when the sound level is high. And the reverse phase sound image is suppressed while the stereo image is enhanced. For example the vocal sound, which is located at the center between L and R speakers, is kept clear by using the multiplying mode.
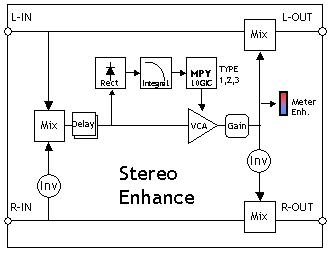
 <Parameter description>
Level(dB) : The mixing level of (L-R)
Delay Time(ms) : The delay time of (L-R). This should be set form 10ms to 25ms. The shorter delay time results in the unnatural frequency characteristic and the longer delay time gives duplicating sound like echo. You should choose the proper delay time carefully.
Enhancer Type: The types of enhancer algorithm
The following description is about the types of enhancer. And each figure shows the L-R signal waveform of usual pop music.
1.LvN : Normal Type: This type simply adds the L-R signal. The enhancement sound image or level is the most natural. But the centered sound source between L and R ch would be smaller when the mixing level is high.
2.Lv1: Multiplying Type #1: This type adds the L-R signal after multiplying its own level. The L-R signal will be added when its level is comparatively higher. So, the unnecessary reverberation in the music will not emphasized and the vocal sound, which is located at the center between L and Rch, can be kept still clear even when the mixing level parameter is pretty high. However, if the music would have a one-sided sound source to Lch or Rch, the level transition of enhancement may be unnatural.
3.Lv2 : Multiplying Type #2: This type adds the L-R signal after multiplying the square of its own level. The enhancement character will be more emphasized than the Type #1.
4.Tr- : (L-R) Transition type : This type adds the L-R signal with following level transition of (L-R). This mode can present less reverse phase sound and more natural than the type3.Lv2.
5.Tr+ : (L+R) Transition type : This type adds the L-R signal with following level transition of (L+R). This mode can present a special kind of spacious effect. The attack sound like kick or snare drum will be spread and it presents less reverse phase sound.
Input Automatic Gain Controller (AGC)
After the stereo enhancer, the audio signal is sent to the input AGC. The recording level of every song is different. This AGC will uniform the sound level sent to the multiband limiter in order to always get the best effect. This AGC has a crossover at 200Hz and the low and high bands are processed separately.
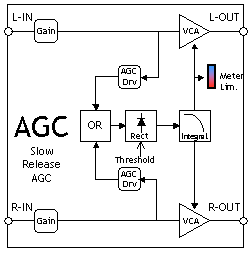
<Parameter description>
AGC Drive (dB): The limiting ratio. The larger ratio make the input level smaller.
AGC Threshold Level (dB): The threshold level for detecting the input level. The signal under this level will pass through the AGC.
AGC Release(1-4): Release Time of AGC.
- 1.slow:Release Time = 10sec/6db
- 2.mid slow:Release Time = 7.5sec/6db
- 3.mid fast:Release Time = 5.0sec/6db
- 4.fast:Release Time = 2.5sec/6db
Pre-emphasis booster and HF limiter
After the AGC, the audio signal is sent to Pre-emphasis block. FabulousMP3 supports 50us and 75us pre-emphasis booster. In order to avoid the HF(high frequency) clipping by the pre-emphasis booster, the HF signal, added to main audio line, is suppressed by the HF limiter.
<Parameter description>
PreE: Pre-emphasis selector. Either of OFF / 50us / 75us can be chosen.
Th. (dB): Threshold level of HF limiter.
Drv. (dB): HF limiting ratio.
![]() FabulousMP3 has a de-emphasis LPF. This "EMP" button can be used to switch the de-emphasis LPF. When you use FabulousMP3 as a pre-processor for your FM broadcast, you should turn on de-emphasis if you are using pre-emphasis booster in your FM stereo generator.
FabulousMP3 has a de-emphasis LPF. This "EMP" button can be used to switch the de-emphasis LPF. When you use FabulousMP3 as a pre-processor for your FM broadcast, you should turn on de-emphasis if you are using pre-emphasis booster in your FM stereo generator.
When creating WAV files or playing back with FabulousMP3 directly, this de-emphasis option should be always turned ON.
Multiband Limiter
The signal from the input AGC is divided into 6 bands by the crossover BPF (Band Pass Filter). Each band signal is fed to the multiband AGC. These AGCs have comparatively faster attack and release time than the input AGC, and they works as compressors.
The feedback-type level detector always has the response delay. To make the attack time "zero", the audio signal is delayed to the detected level signal. FabulousMP3 has 20ms delay form input to output.
Only the bass band (Band #1) has can be adjusted this delay time. This delay time affect the attack strength or clipping effect of the bass band.
Soft-Knee Clipper
The multiband AGC cannot follow the sudden peak sound like a loud kick drum and the peaks pass through the AGC. The peaks overshoot the output dynamic range. To avoid it, the signal is sent to a clipper which cuts the waveform over a certain threshold level. The clipper performs, so called, "soft knee" clipping and it suppresses the high frequency distortion when clipping occurs.
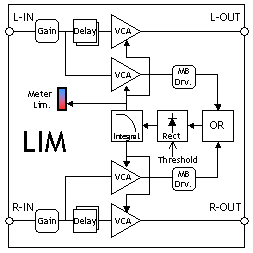
<Parameter description>
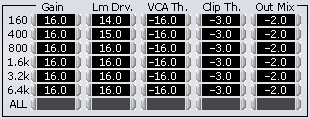
Input Gain (dB): The gain of input amplifier. The higher setting gives the stronger density of sound and the smaller setting makes the sound closer to the original source.
Comp Drive (dB): The limiting ratio. The larger ratio makes the input level smaller.
VCA Threshold Level (dB): The threshold level for detecting the input level. The signal under this level will pass through the AGC.
Clipping Threshold Level (dB): The clipper cuts the signal which overshoots this level.
Output Mixing Level (dB) : The mixing level of each band signal. It can be used like a graphic EQ.
Master Band Attack / Release Time
This determines the attack and release time of multiband level detector. The longer release time gives softer sound, and the shorter release time gives high density sound. And the shorter attack time reduces the distortion of peak sound by following input sound faster.
![]() <Parameter description>
<Parameter description>
MB Atck/Rel: Multiband Limiter Attack / Release Time
The unit is shown as 'msec', but the time does not correspond to the actual time. The parameter should be adjusted by your own audibility. Fast attack time gives less distortion, however the sound density may be lost.
Bass (Band #1) Attack Time (ms)
![]() This "Bass Attack" parameter can be used to gain the 'bass punch' without increasing the bass peak level. When making the attack time slower, the edge of kick drum will be emphasized and it sounds more punchy.
This "Bass Attack" parameter can be used to gain the 'bass punch' without increasing the bass peak level. When making the attack time slower, the edge of kick drum will be emphasized and it sounds more punchy.
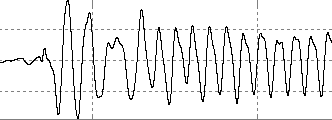
The following figures show the response of typical kick drum.
* The original waveform of kick drum.
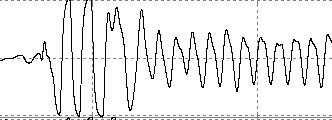
* When setting 'Bass Attack" to 40ms, the first 3 cycles of waveform are emphasized, clipped by bass clipper and changed to square waveform. The edge of kick drum will be emphasized lightly.
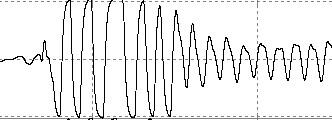
* When setting 'Bass Attack" to 80ms, the first 6 cycles of waveform are emphasized, clipped by bass clipper and changed to square waveform. The edge of kick drum will be emphasized strongly.
The recent pop music or the other category of music, which is configured as a kick drum and a bass guitar, is determined its character by the attack and the loudness of bass part. By uniforming the bass sound character with FabulousMP3, you can listen to any music smoothly without adjusting the tone knob of your audio amplifier.
* The typical bass attack time is about 40ms. If you want to get more punch or if you listen mainly with headphone, you can set it to about 80ms.
Final Clipper
 After the each band signal is mixed, it is sent to the final clipper. And the 15kHz LPF, which suppresses unnecessary high frequency signal, follows the clipper. This LPF can be turned off.
The parameter 'Type' determines the clipper type.
'ADPTV' means the adaptive clipper which is configured with a very fast (0.1msec) agc. It is capable to reduce the overshoot with less distortion at the final clipper.
'HARD' means the hard clipper. It gives much distortion at the final clipper, but the sound will be brighter.
Overshoot Cutter
![]() Just before the output, there is a clipper to cut the overshoot generated by the previous soft-knee clipper and final LPF. This threshold level should be set about 0.5dB higher than the previous final clipper threshold level.
Just before the output, there is a clipper to cut the overshoot generated by the previous soft-knee clipper and final LPF. This threshold level should be set about 0.5dB higher than the previous final clipper threshold level.
The output clip indicator lights at -0.2dB to the maximum level of 16bit digital audio signal. You should set this threshold level as the indicator barely lights.
<Parameter description>
Clipping Threshold Level (dB): The clipper cuts the signal which overshoots this level.
LPF(on/off): The effect switch of final LPF.
Th.(dB) : Threshold level to cut the overshoot
*About Overshoot Compensation of FabulousMP3
At the last part, the compressed signal passes through 'Soft-knee Clipper' , 'Final 15kHz LPF' and 'Overshoot Cutter'. In order to suppress the unnecessary overshoots, FabulousMP3 has such a clipping mechanism. Following figs are the changes of waveform passing through each clippers.
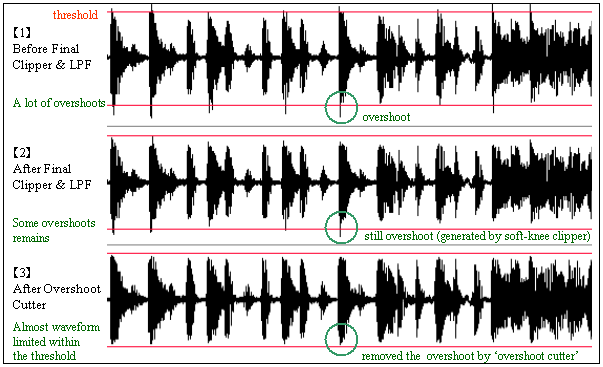
Fig [1] shows the waveform just before the final soft-knee clipper. Many attacks of waveform are overshooting beyond the threshold level.
Fig [2] shows the waveform after the the final soft-knee clipper and 15kHz LPF. Almost attacks are suppressed by the soft-knee clipper, however some overshoots (including the ringing of LPF) still remain.
Fig [3] shows the waveform after the 'Overshoot Cutter'. This cutter means the hard clipper which has the soft clipping characteristic like Zener diode.
By these clipping mechanism, the sound level of any songs can be kept within the 16 bit digital audio range when creating MP3 song library with FabulousMP3. And in case that you use FabulousMP3 as a pre-processor of FM broadcasting, you can always keep 100% modulation.
To create the original sound by changing the factory preset
The following description is how to create original sound by changing the "FM" factory preset.
1. To change density of sound
First, choose one of the factory preset "FM Station - Smooth Listening (Favorite FM )" which can be restored by pressing "FM" button. This simulates the urban FM station sound which provides the smooth and punchy sound.
If you feel that the sound is too loud or persistent, you should get down the "Gain" parameter of multiband limiter. Then, the persistence is getting smaller, meanwhile the output gain is also getting smaller.
<NOTE> You can change the "Gain" of all bands together by pressing "ALL" button of the gain parameter.
In the alternative, you can increase the dense of sound by setting the 'MB Release Time' parameter to shorter time.
2. Adjusting the equalization to get the brighter sound
FabulousMP3 have no output equalizer but you can get the same effect by adjusting the output mixing level of each band. "Outmix" parameter of multiband limiter means the mixing level of its band.
You should be careful about the following issue. If you make the mixing level too high, the sound level is getting large and the waveform will overshoot the permitted dynamic range. This will cause the dirty clipping distortion.
You should make the proper setting of "Outmix" to have the output sound hit the final clipper sometimes. You can see the clipping state by the red indicator under the level meter.
If you want the brighter sound, you should raise the 3.2k or 6.4k outmix by 1 or 2 dB.
3. Emphasizing the bass band to create the punchy sound
It is very hard and delicate to make the bass sound punchy and loud. You can get louder bass by simply raise the outmix of bass band, but the bass will overshoot the permitted dynamic range.
In case like this, try the following way. First you raise the 160Hz Outmix by 1 or 2 dB, and next you get down the "Clip Th." by the same level. Then, the loudness of bass band can be gained, meanwhile the maximum level can be kept and the bass band will not overshoot the dynamic range.
This is one of the special technique to get loud and punchy bass. But too much adjustment will make the boom sound like organ which is short of the attack of bass. The bass attack is the important factor.
In the alternative, you can emphasize the bass punch by adjusting the 'Bass Attack' delay time to longer. The longer delay distorts the edge of bass part such as kick drum or bass guitar and you can get the more punchy sound.
4. Adjusting the bass EQ and Attack Time
The bass parametric EQ can emphasize the loudness of bass band. The almost FM stations raise the level around 80Hz by 3 to 6 dB. This affect the comfortable bass sound.
Even if you raise the bass EQ, the output peak level is not getting larger because the multiband limiter after suppresses the peak level. In case you raise the bass level by the EQ, the bass band hits the limiter hardly. It creates the special and comfortable sound peculiar to the FM broadcasting sound.
5. The other parameters of multiband limiter (Drive, VCA Th.)
The "Drive" or "VCA Th." parameter often affects the other parameters and it is very hard to create the sound you like by adjusting these parameters. These two parameters is strongly recommended to be left as it is.
6. To save your sound parameters
You can save and load the sound parameters to a file. The file extension is ".prm".

