Index > Account Setting Management
ForwardMail
User's Manual
Account Setting Management
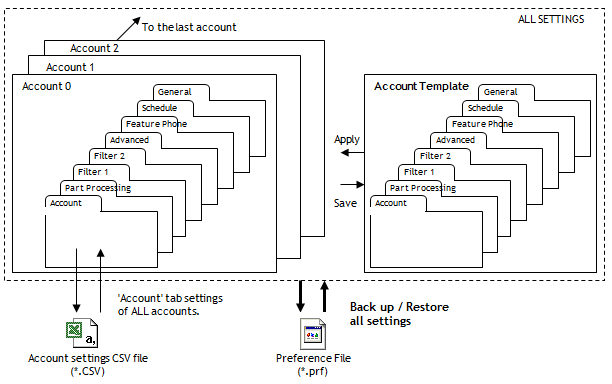
This functions can be used to set up account information and quickly for specially 100 account version. The account settings in 'Account' tab can be written out to a general CSV file, and the settings can be restored and applied after editing CSV file.
Choose 'Manage account settings' of 'Options' menu.

Back up / restore all settings
Backup all settings to a file
All of the current settings can be saved to a file. All preference information including license information will be saved.
Restore all settings from a file
The preference file(*.prf), which has been saved by 'Backup' menu, can be restored and applied. All preference information including license information will be restored.
Set multiple accounts at a time by 'Template' function
Copy account settings to template
This 'Template' function can be used to set up many accounts at a time. Once creating a template of account settings, you can copy the template to specified multiple accounts at a time. The main switch in the server setting of the applied accounts will be disabled. You can copy specified account settings to the template by choosing this menu.
Edit setting template
You can edit the template by choosing this menu.
Apply template to specified accounts
Once creating a template of account settings, you can copy the template to multiple accounts at a time. If using the option "Don't copy the template setting in the 'Account' tab", the template settings except the 'Account' tab will be copied. The recommended usage is that the option is always enabled, you create a template of common settings, copy it to multiple accounts and then set the individual information for each account. The individual settings in the 'Account' tab can be loaded from a CSV file. See below.
Set each account settings by CSV file
After editing the settings in CSV file mentioned above, the settings can be restored and applied.
[NOTE]
1. To create CSV file, first you MUST export settings to a CSV file and then edit it.
2. The first line of CSV file MUST NOT be changed.
3. IMPORTANT!! It is recommended to save (back up) the preference file by the function 'Backup all settings to a file' before importing CSV file. The author will NOT take responsibility for any problems. See licence agreement for details.
4. If ForwardMail application cannot be launched after importing CSV file, you should restore the preference file in Windows directory manually. The preference file should be saved in "C:\Users\[user_name]\AppData\Local\VirtualStore\Windows"
The preference file name is like followings:
* 10 account version : fwdm4_std10.prf
* 30 account version : fwdm4_std30.prf
* 100 account version : fwdm4_sp100.prf
5. The CSV file must not include any ' " ' (double quotation) or ' , ' (comma) character.
The CSV file format is like followings:
Group in dialog box |
Item Name in CSV |
Content |
Account number |
FWDM_PRF |
Account number |
Account preference for: |
Account name |
Account name string |
Timer |
Time |
Interval in minute ( 1 - 1440 ) |
Main switch |
Enable account |
Enabled=1 Disabled=0 |
Forward to: |
Destination |
Address |
Mailbox information |
Mailbox address |
Mail address for mailbox |
|
|
Mailbox ID |
ID for mailbox |
|
|
Mailbox Password |
Password for mailbox |
|
|
POP server |
POP server name |
|
|
POP Port |
POP server port number |
|
|
SMTP Server |
SMTP server name |
|
|
SMTP Port |
SMTP server port number |
|
|
APOP |
Enabled=1 Disabled=0 |
SMTP Auth. |
SSMTP |
Enabled=1 Disabled=0 |
|
|
SSMTP USER |
Secured SMTP user ID |
|
|
SSMTP Password |
Secured SMTP password |
Use separate SMTP |
Separate SMTP |
Enabled=1 Disabled=0 |
|
|
Separate SMTP address |
Sendre's address |
|
|
Separate SMTP P-before-S |
Enabled=1 Disabled=0 |
|
|
Separate SMTP P-before-S POP server |
POP server name for P-before-S |
|
|
Separate SMTP P-before-S POP port |
POP port number for P-before-S |
|
|
Separate SMTP P-before-S APOP |
Enabled=1 Disabled=0 |
|
|
Separate SMTP P-before-S POP ID |
POP ID for P-before-S |
|
|
Separate SMTP P-before-S POP password |
POP password for P-before-S |
Delay POP/SMTP Auth |
Wait POP |
Enabled=1 Disabled=0 |
|
|
Wait POP sec |
Waiting time in second ( 1 - 3600 ) |
|
|
Wait SMTP |
Enabled=1 Disabled=0 |
|
|
WAIT SMTP sec |
Waiting time in second ( 1 - 3600 ) |
Delete incoming emails just.. |
Delete after fwding |
Enabled=1 Disabled=0 |
|
|
Delete after fwding(mode) |
Except filtered=0 All=1 |
How to import the settings from the previous version or another account version
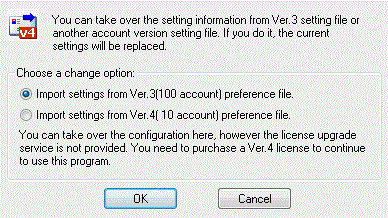
You can take over the preference settings from the previous version or the other account version.
To use this function, choose "Change Version.." from "Options" menu.
*Import settings from Ver.3 (--- account) preference file.
You can take over the settings from Ver.3 by choosing this option. After pressing 'OK', choose the preference file which is located in the Windows folder by default installation. The file name will be set automatically in the file selection dialog.
[Notice]: You can take over the settings from the previous version here, however the license upgrade service is not provided. To use Ver.4, you need to purchase a new license for it.
*Import settings from Ver.4 (---account) preference file.
This option is for 100 account version (ForwardMail for Administrator). It is not available for 10 account version. You can take over the settings from 10 account version.
[Note]:
You can take over the settings from 10 account version here, however the license upgrade service is not provided. To use 100 account version, you need to purchase a new license for it.


